

A Dying Planet |
|
|---|---|
 |
|
Type |
Heleus Assignments |
Giver |
Kiiran Dals |
Location |
Havarl Angaran Headquarters |
Previous |
Helping Havarl's Scientists |
Next |
?? |
Level |
?? |
A Dying Planet is a Mission in Mass Effect Andromeda. Missions advance the main story, and flesh out the side content of the game as well as provide opportunities for rewards and exploration.
A Dying Planet Information
"Mission description goes here."
Objectives
- Talk to Kiiran Dals about Havarl's problems.
- Find the entrance to Mithrava, The Sanctuary
- Reach the top of Mithrava
- Go to the location Esmus mentioned
- Locate Zorai's heirloom
- Go to Taavos' Roekaar camp
- Defeat the Roekaar at their camp
- Find Taavos
- Meet Taavos at the entrance of the lost monolith
- Accompany Taavos to the monolith
- Examine the remains
- Activate Havarl's third monolith
- Find and activate Havarl's vault
- Turn on emergency power
- Lift the lockdown on the vault
- Escape the purification field and exit the vault
- Return to Kiiran Dals
Rewards
- ??
- ??
- ??
Walkthrough
 Talk to Kiiran Dals About Havarl's Problems
Talk to Kiiran Dals after saving her team in Helping Havarl's Scientists. Then talk to her again to get started. Torvar tells you there's a missing monolith and broken systems must now be restored by activating the vault.
Find the Entrance to Mithrava, The Sanctuary
Go east to the Chasm of the Builders and then follow south, jump over the wall of Remnant blocks. Follow the water to the south until you reach a Remnant door and go in. Head to the back wall that looks like a green waterfall, use your scanner to uncover an underground conduit leading to a Remnant console. Climb over some boulders here to find a console and activate it.
Reach the Top of Mithrava
Go west to a Remnant platform with a pillar and jump to the top of the pillar and begin jumping upward using a narrow ledges. You need to pass four floors to reach the top. At the top, find a Gravity Well trigger. Interact with it to levitate horizontally across the room you just left below. Enter a tunnel on the east side. Run to the end of the bridge and find another Gravity Well. Use it to move up and exit the tunnel to an exterior ledge.
Follow the ledge path to the right and you will reach a container, but its guarded by Nullifier. Follow the path to the left of the exterior to continue your way to the top. Jump off the ledge at the left corner and follow the path past the statue on the left. You will face an Observer and some Breachers, kill them and find a Remnant console near some Remnant pillars. Use this console to lower the ledge above and jump on the ledge above the console. Turn back and find some pillars on the other side. Jump to them and climb up to a ledge above. Walk around and drop to the lower ledge at the end to find another console, use it to create a bridge to the other side. Cross the bridge and walk around the left corner, defeat the Observer, and reach the next ledge above. You will face Breacher, then go to the end and use some pillars to climb up. There's Observer hovering above. You will find a Remnant console, use it to create another bridge. Cross this bridge and go the end of this path. Find another pillars to climb up and eventually you will be able to jump to the platform with a vault-like doorway. Enter Mithrava Tower and find a Gravity Well. Use it to ascend to the top of of Mithrava, where you will find Angara.
First Sage Esmus will greet you there. Talk to him about Havarl and missing monolith. He will tell you that Angara lost the memory of that monolith. They believe in reincarnation and that the Angara reincarnated from Zorai can obtain the memory of the monolith. Wander around the top to speak with inabitants. Activate the forward station and find the memory trigger nearby.
Go to the Location Esmus Mentioned
Use the forward station in the middle of Havarl, it will be closer to your destination. Go to the north to reach the Remnant vault in the Remnant Abyss and enter the vault.
Locate Zorai's Heirloom
Go to the end of the room and use the Gravity Well to reach the lower part of the vault. Exit through the only door and interact with a Remnant console in the next room. This console will open some doors and wake some Remnant. Defeat them and go through the door on the right. Keep going forward until you find another door. In the next room is a Remnant turret and Destroyer. After dealing with the enemies, find a console on the right side of a room and activate it to create a bridge. Cross the bridge to find a container. Go back to the room and continue to another hallway. Reach next room, defeat the enemies and use the Remnant console, which opens the next door and releases some of the enemies. On top of the pillar in the middle of a room is a container. Go forward until you reach a closed door. Hack it to open and inside the room you will find ancient remains, this is what you came for. You can also find some ancient data drive, Remnant core device and containers. Exit via Gravity Well.
Go to Taavos' Roekaar Camp
Exit the Remnant vault and go the the Chasm of the Builders. When you arrive, the bridge will extend and Raiders will attack you. You can scan the bridge for the research data. Cross the bridge and at the top of the bridge platform you will find unlocked Remnant door. Go through it to discover an ancient courtyard. At the end of the next platform you will find a forward station. Go north until you find another platform, this is the Roekaar camp in Old Pelaav.
Defeat the Roekaar at Their Camp
Just simply clear the camp and use the radar.
Find Tavoos
At Old Pelaav go to the first building on the left and find a Roekaar datapad. In the building on the right is another datapad. In the same building you can find something for The Lost Sister quest. Find Taavos in the central building and convince him to help you recover the lost memories of the Remnant monolith.
Meet Taavos at the Entrance of the Lost Monolith
Travel to the north Chasm station, jump into water and go north to the end. Follow the navigation point until you find Taavos.
Accompany Taavos to the Monolith
As Taavos starts to remember sites he's never been to, the Remnant pillars will drop and reveal a tunnel behind them. Allow Taavos to be your guide and follow him until you reach a dead-end. Find some remains on the ground.
Examine the Remains
Scan the remains and find the audio log of Zorai, who speaks about Remnant machines. Then follow Taavos and continute to the north. A Remnant wall will drop and reveal the end of a tunnel with a Gravity Well.
Activate Havarl's Third Monolith
Use the Gravity Well to reach the bottom of the cave. Follow the navigation point and find a Remnant console. Use the console to activate the third Monolith. Also search the Forgotten Depths for a memory trigger. Before leaving, return to the Gravity Well, face the console, and follow the left path. There will be a trio of platforms. Face north-northwest, and you will see a slope heading up. You can jump jet across and keep climbing until you're overlooking the area. There are some minerals and tech to scan up above.
Find and Activate the Havarl's Vault
Go back to the entrance, once outside check the map to find a Remnant vault icon. It will be not far from Mithrava, in the ancient courtyard. Use the forward station to get there quickly. When you reach the courtyard you will notice bright beams marking the vault to the south. Enter the vault and use Gravity Well to go down.
Turn On Emergency Power
You will land on the lowest floor and should see a Remnant power console in front of you. On the opposite side is another power console. Use both of them and prepare for a fight with Observers.
Lift he Lockdown on the Vault
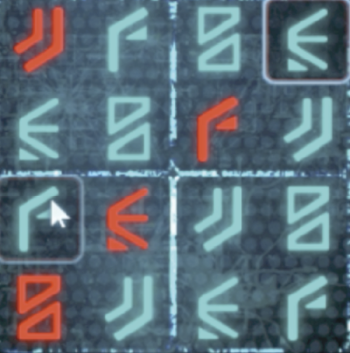
Turning on the power will start four other consoles in this room that point blue lasers at the locked door. The key to unlock the door is to turn each laser white. To do this, you must activate these consoles in particular order, according to the number of the orbs above each. Turn your back to the locked door and activate them in this order: Lower Right, Upper Right, Lower Left, Upper Left. After that all consoles should point white beams toward the door and the Purification Chamber opens. Check all containers before lifting the lockdown. In this room is also another console with a glyph puzzle. Solve it using the pattern below (or by your own, if you want). It will remove the force field in the previous room and allow you to check the container. Then you are free to use the Purification Console.
Escape the Purification Field and Exit The Vault
Activate the Purification Field console. This vault is the smallest in the game, so escaping won't be a problem. Run to the Gravity Well in the next room. Run back to the previous room, the door is closed but it will open in a few moments. Go the back platform and use the console, this will shut the door. Then you may leave the vault. You will earn 900 AVP.
Return to Kiiran Dals
Speak to Kiiran to end the mission. It will earn you more AVP.
Notes
- ??
- ??
 Anonymous
I can't finish quest. When I try to talk Kiiran Dals as it loads a black screen endlessly.
- Anonymous
So I've scanned the remains and nothing happened. The angarl is just frozen there. Any ideas?
- Anonymous
I have re-loaded previous saves 3 times now, successfully decrypted the console on the other side of the purification chamber, and still, the barrier under the turret will NOT drop so I can get the Remnant Tech. What am I missing? Why won't it open? This is getting to be extremely frustrating
Thanks.
0
+10
-1